Reversing ELFs on TryHackMe: Part 1
Safe-space
Please don’t ever execute any random ELF/PE binary you find on the web. Even if it comes from a trusted source like HTB or THM, we should always work in a segmented environment. Since these challenges are all ELFs, I spun up a Kali machine (you can literally use any OS to do these, I just had a VM ready to go) to run through these. Once you’ve done that, you can just log in and download each of the challenge files.
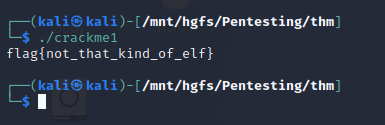
Crackme1
The simplest thing we can do when reversing is to start by just executing the program. These binaries are not necessarily going to have execute privilege when we download them. Because of that, we’ll need to run a quick chmod +x crackme to be able to run these. Once we’ve done that, we can just use the syntax ./crackme to execute our binary.
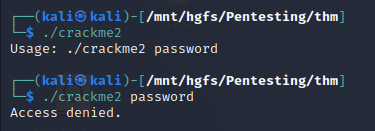
Crackme2
We’ll start this challenge the same as the previous - by executing (and will do so going forward so assume that’s always step 1). It was worth a shot, but it looks like we’ll have to try something new.
So now on this second challenge, we’ll need to expand our toolset slightly. One thing that’s useful to know about compiled programs, is that they need to contain all the information (for the most part) that the computer would need to know in order to run all the instructions inside. One key thing we should always check for (low-hanging fruit) are hardcoded strings or functions. In linux (and on Windows via sysinternals tools), we can utilize a super straight forward program called strings to output this information. When we run strings we’ll see something like this:
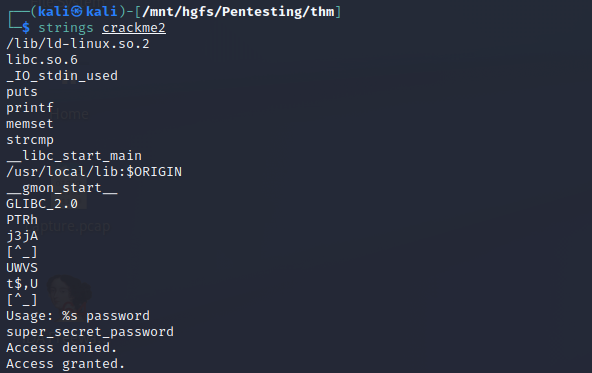
As we can see from the above output, we see the input prompt string followed by our ‘Access Denied’ text, so we can assume that the strings around that area have to do with that function - let’s try it!

Crackme3
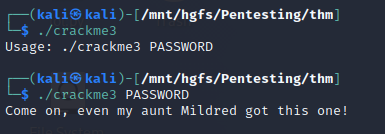
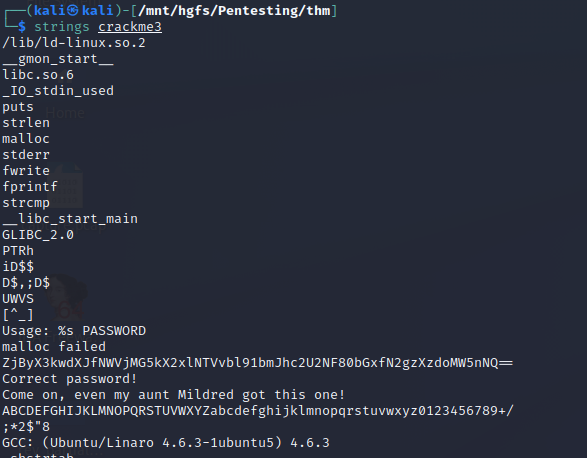
So it looks like we have to add another tool to our kit here, and it’s something that you’ll learn to love and hate in this field… base64. If you notice, our password looks like gibberish, but it has the telltale sign of being a base64 encoded string (ends in ==). Luckily, linux has a built in program that allows us to work with this type of encoding and it’s called… base64… yeah, not the most exciting name but like everything commandline it’s functional! We’ll use the -d (for decode) flag and feed this string in via a pipe. For a full list of command flags, please reference the man pages!

Crackme4
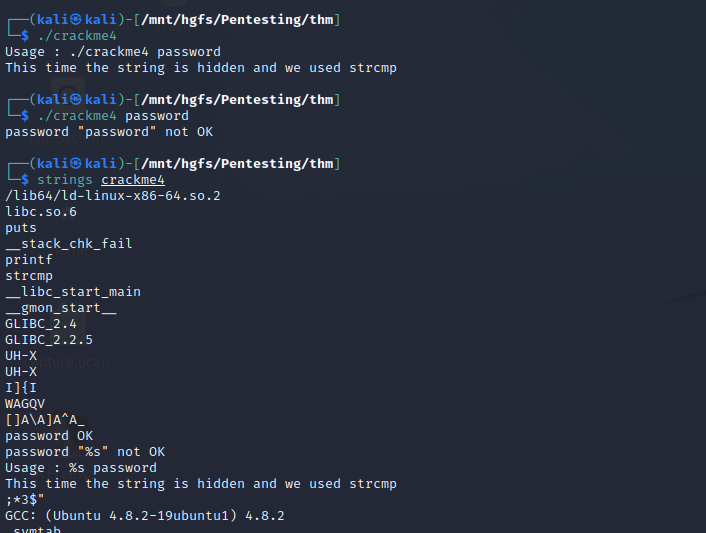
Well this is interesting, it’s telling us the password is hidden. Sure enough, when we run strings we also don’t see it where we expect to. So now is where we can get into some really cool stuff… debugging! To do that, I’m going to use a souped up version of GDB called pwndbg which can be found here. Don’t let the appearance scare you, I’m using it specifically since it shows me the stack and register values as the program is running. Since the authors were kind enough to tell us they used strcmp we know that at some point the actual password must be placed onto the stack or within a memory register to be used in the string comparison operation. To start debugging you can just run gdb crackme4.
Starting with Debugging
One of the first things we’ll want to do is determine the behavior of this program to determine at what point it performs a string comparison. Remember when I told you that strings can also be used to find functions that are defined in a program? Let’s see if anything of interest can be found:
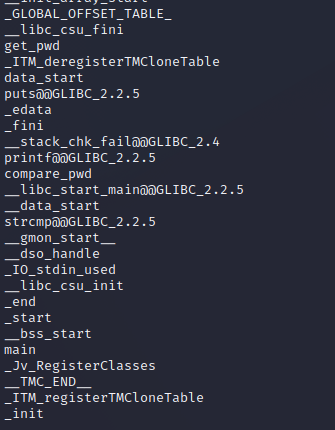
As you can see from the above screenshot, we have some functions that are definitely of interest:
get_pwdcompare_pwdmain- and of course, we can see our
strcmp@@GLIBC_2.2.5function that performs the comparison.
Breaking stuff
So what do we do from here? Armed with this knowledge, we can actually set breakpoints in our program using a debugger to stop the program at a certain point in memory temporarily. We can leverage that to stop the program right at the string comparison function and see if we can find the password on the stack. Since we can clearly see a function called compare_pwd, let’s disassemble that function name to see what its contents are. In gdb we can use disass (short for disassemble) and the function name compare_pwd like this:
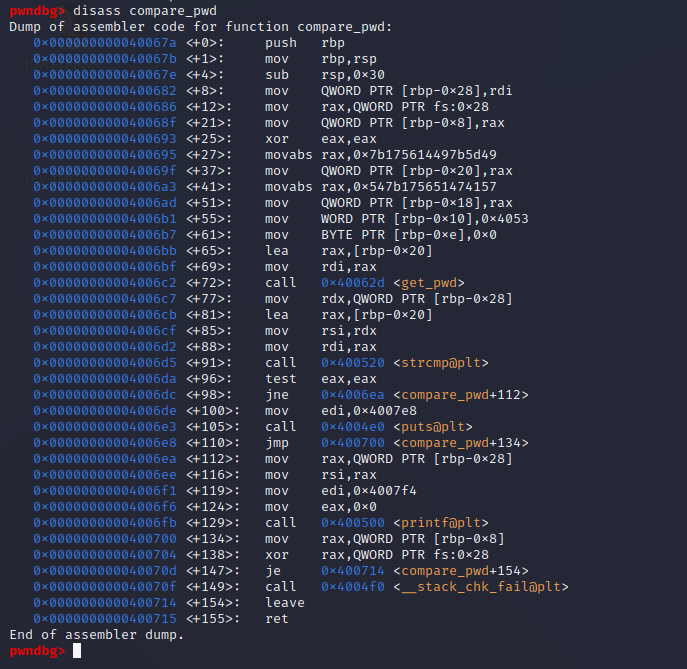
Let’s break down the important portion:
  0x00000000004006c2 <+72>:    call   0x40062d <get_pwd>
  0x00000000004006c7 <+77>:    mov    rdx,QWORD PTR [rbp-0x28]
  0x00000000004006cb <+81>:    lea    rax,[rbp-0x20]
  0x00000000004006cf <+85>:    mov    rsi,rdx
  0x00000000004006d2 <+88>:    mov    rdi,rax
  0x00000000004006d5 <+91>:    call   0x400520 <strcmp@plt>
  0x00000000004006da <+96>:    test   eax,eax
  0x00000000004006dc <+98>:    jne    0x4006ea <compare_pwd+112>
  0x00000000004006de <+100>:   mov    edi,0x4007e8
  0x00000000004006e3 <+105>:   call   0x4004e0 <puts@plt>
  0x00000000004006e8 <+110>:   jmp    0x400700 <compare_pwd+134>
  0x00000000004006ea <+112>:   mov    rax,QWORD PTR [rbp-0x28]
  0x00000000004006ee <+116>:   mov    rsi,rax
  0x00000000004006f1 <+119>:   mov    edi,0x4007f4
  0x00000000004006f6 <+124>:   mov    eax,0x0
  0x00000000004006fb <+129>:   call   0x400500 <printf@plt>
We can see that we have a few function calls of compare_pwd and then we have a printf which likely is our final output telling us if our password was correct (or incorrect). What I’m going to do is set a breakpoint at the point the program executes call 0x400520 <strcmp@plt> by using the command b * 0x400520. I’m using this memory address because I’m operating under the assumption that if we’re calling a comparison, then our hidden password must already be loaded into memory somewhere by this point. Once we set our breakpoint, we can execute the program and it will pause right at the string comparison. Once there, we can view the registers:
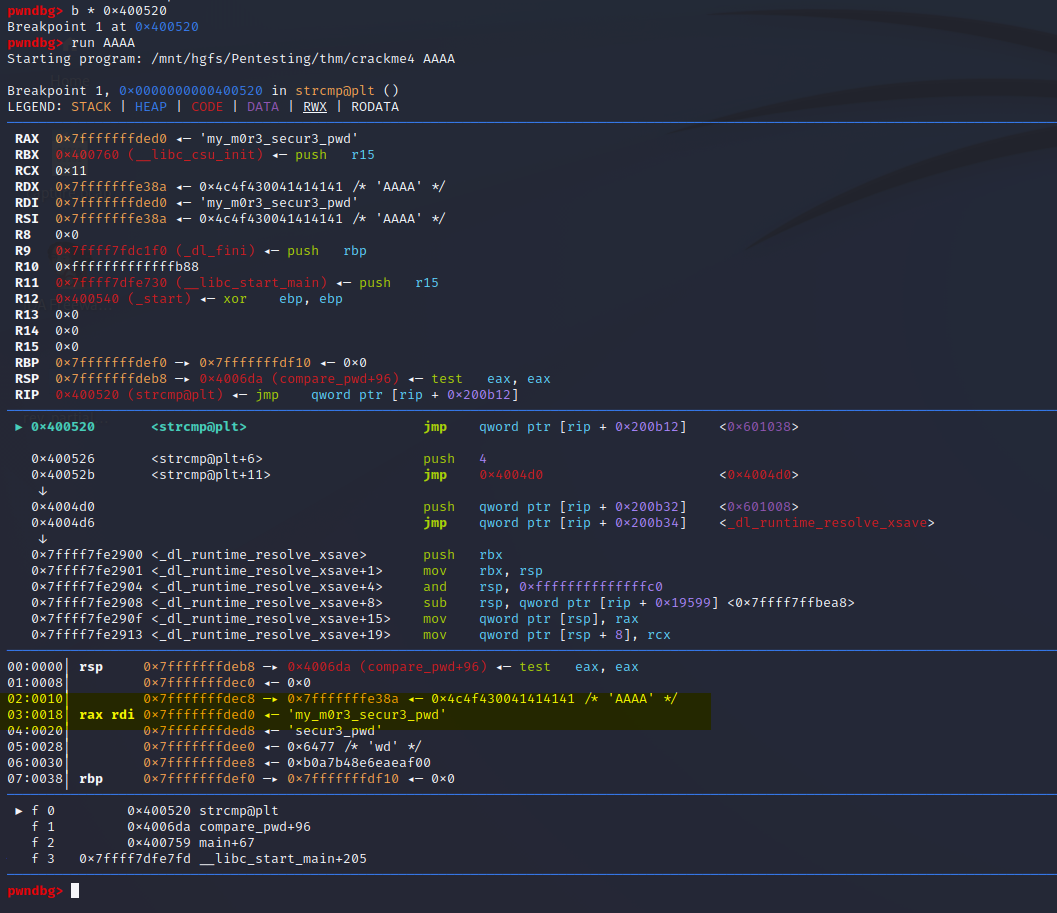
Stack-em up
This may look insane at first, but the concept here is super simple. Let’s break it down
LEGEND: STACK | HEAP | CODE | DATA | RWX | RODATA
──────────────────[ REGISTERS ]─────────────────────────
 RAX  0x7fffffffded0 ◂— 'my_m0r3_secur3_pwd'
 RBX  0x400760 (__libc_csu_init) ◂— push   r15
 RCX  0x11
 RDX  0x7fffffffe38a ◂— 0x4c4f430041414141 /* 'AAAA' */
 RDI  0x7fffffffded0 ◂— 'my_m0r3_secur3_pwd'
 RSI  0x7fffffffe38a ◂— 0x4c4f430041414141 /* 'AAAA' */
So our password input of “AAAA” we can see is being stored in RDX and RSI and the hidden password is being passed to both RAX and RDI (if you want to know what the hell these register names are for please take a look at this awesome resource from MIT here). This confirms the earlier suspicion that the passwords are being stored in physical memory during the function calls (spoiler, it won’t always be this easy).
As we continue through these, and the difficulty ramps up… understanding how to view the stack and see what’s happening instruction by instruction will allow us to test behavior and start to build a deeper understand of a program’s internal flow without even seeing the source code.
Part 2 — to be continued!
Find Part 2 HERE